
So You Want to Paint Your Refrigerator: How to Paint a Fridge in 6 Steps–
A total fridge transformation can cost you less than $75.
The following written content by Yelena Moroz Alpert
Why wouldn’t you paint your fridge? In the age of Technicolor kitchen cabinets, it’s only logical to spruce up your ice box with some pigment. Especially one that has seen better days. “A fridge can be a costly item to replace, and if in good working order, painting is a quick and easy way to improve its appearance and inject color and personality into a space,” says Jemma Wlasichuk, decorative painting specialist and cofounder of Shed Eleven in Sydney, Australia. “It’s such a large, central piece, and yet people often overlook them when choosing projects to paint.”
DIY’ers worldwide are picking up the paintbrush and updating the standard appliance to suit their style: From matte black-and-gold makeovers to whimsical gold and black-and-white stripes made with washi tape and hand-painted fridges that mimic wallpaper. “Their shape is basically a blank canvas, and the possibilities with paint are literally endless,” Wlasichuk adds.

Think of it as just another piece of indoor furniture. Most of our experts didn’t even empty the fridge prior to the paint job, just moved it away from the wall for easy access. The project should take between two and four hours, depending on the size, detail, and drying time between coats. What’s more, since you’ll only need a quart each of primer, paint, and sealer, you can make it out under $75—a far cry from the new color-splashed fridges that cost more than $2,000. See how you too can score a fab fridge below.
Choose a color, any color
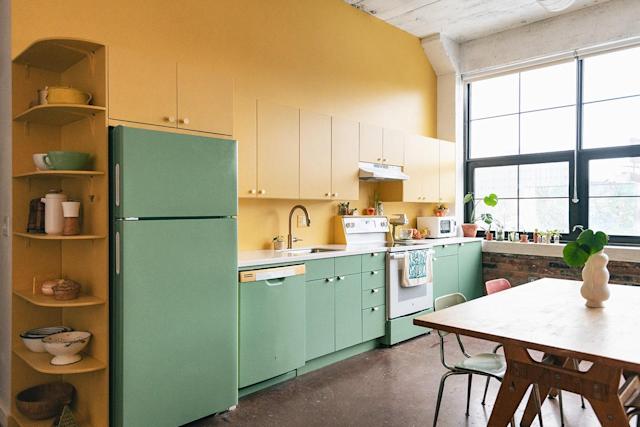
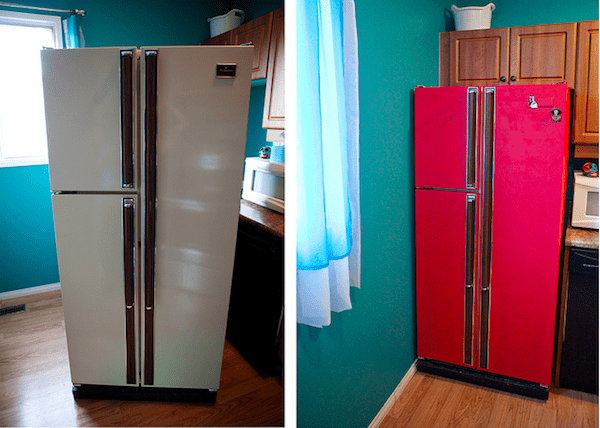
When choosing a new fridge color, think about how it will set the tone in the space. Lauren Hom—a Detroit muralist and instructor on the online learning platform Skillshare—spared herself the headache of searching for the perfect color and right size fridge by using leftover sage-tinted interior mural paint, Clare OMGreen in an eggshell finish, to rework a basic white fridge to match the cabinets in her green-and-yellow kitchen. Alternatively, Kim Yates—a decorating enthusiast in Barrowford, England, who chronicles her colorful home on @miss_mustard_design—“needed to take some creative action” to transform the stainless-steel fridge that was bequeathed to her by previous owners. To complement her Skittles of a kitchen, she chose a blue-toned lilac (similar to Farrow & Ball Sugared Almond No. 9913) to play nice with the pink, green, and red color theme.
Wlasichuk settled on a moody Annie Sloan Chalk Paint in Amsterdam Green to echo her cave-like laundry room that housed a once-white fridge. “As it’s such a dominant piece, we were keen to soften and integrate it,” she says. “The green makes the fridge recede and adds to the calm atmosphere of the room.”
Once you settle on your color choice, look for a formula that adheres to glossy surfaces, like Behr Premium Ultra Pure Interior Cabinet and Trim paint in a satin finish.
Prep the surface
Before you start, remove the brand logo. Hom says that these badges typically come off by wedging a putty knife under the emblem. For a stubborn adhesive, try this trick: With a hairdryer, warm up and soften the adhesive, then use dental floss to slice through and separate. Now, it’s time to remove door handles—these typically unscrew easily. If you choose to keep them on, but paint in a different color than the body of the fridge, use painter’s tape to maintain crisp lines. Tape is also helpful in working around the ice maker and the rubber seal on fridge doors.
Next, clean the surface. Dip a microfiber cloth in hot water to remove the first layer of grime. Apply a thin paste of baking soda and Dr. Bronner’s Sal Suds Biodegradable Cleaner on stubborn spots. Wipe down. Scruff-sand the corners and edges with 120 grit sandpaper to help with primer adhesion. “Most smooth surfaces will take paint if you rough it up first,” Hom says. She recommends wearing a mask to avoid inhaling dust. Wipe away any debris and remaining cleaning solution with water, then polish the fridge with a clean, dry microfiber cloth.
To prime or not to prime?
Depending on your paint choice, you may not need to prime. Wlasichuk opts for Annie Sloan Chalk Paint as it requires minimal prep (no primer), works equally well on different surfaces like plastics and metal, and dries quickly. For her vinyl, veiny-textured white fridge, Hom used Zinsser Ultimate Stain Blocker primer. A stainless-steel fridge will benefit from a coat of Farrow & Ball Metal Primer & Undercoat. Apply two coats with a four-inch foam roller and one-inch angle brush (in tight spaces).
Paint patiently
Given that a fridge is shaped like a box, actual paint application is fairly smooth. For a fridge exterior with a veiny surface, apply two coats with a foam roller, touching up with the angle brush, to make the texture less pronounced. “Don’t glob on too much, or it might look too chunky,” Hom warns. If your fridge is dinged up a bit, an eyeshadow brush helps get in the little nicks, Yates suggests. When painting the inside panels of the doors, keep it open, avoiding the sealers. A hairdryer can speed up the process. Read more from Architectural Digest.